How To Install Opengd77 Python Cps Software
January 24, 2025
How To Install Samsung Sound Bar Sh59-027338
January 25, 2025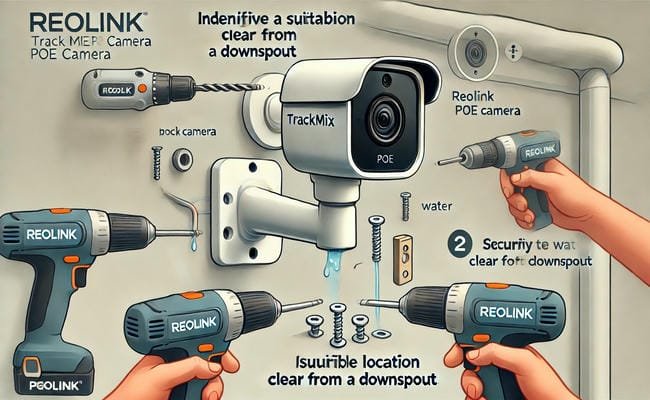
Installing a Reolink Trackmix PoE (Power over Ethernet) camera away from a downspout ensures better visibility, reduced interference, and protection from potential water damage. This guide provides step-by-step instructions for a successful installation.
Why Install the Reolink Trackmix PoE Away From a Downspout?
Positioning the camera away from a downspout helps:
- Avoid obstruction caused by water or debris.
- Improve the field of view for the camera.
- Extend the camera’s lifespan by reducing exposure to excess moisture.
Steps to Install Reolink Trackmix PoE Away From a Downspout
- Choose the Optimal Location:
- Select a spot that provides a clear view of the desired area.
- Ensure it’s at least 2-3 feet away from the downspout to avoid water spray or debris.
- Prepare the Necessary Tools and Materials:
- Tools: Drill, screwdriver, Ethernet cable, and mounting template.
- Materials: Mounting screws, anchors, and weatherproof Ethernet covers (if needed).
- Mount the Camera Bracket:
- Use the mounting template to mark screw positions on the chosen surface.
- Drill holes and insert wall anchors if mounting on a hard surface like concrete or brick.
- Attach the camera bracket securely using the provided screws.
- Connect the Ethernet Cable:
- Run an Ethernet cable from your PoE switch or injector to the camera location.
- Use weatherproof covers to protect the cable and connections from moisture.
- Attach the Camera:
- Align the Reolink Trackmix PoE camera with the bracket and secure it in place.
- Adjust the camera angle to cover the intended area.
- Test the Connection:
- Power on the PoE switch or injector and ensure the camera receives power and connectivity.
- Check the camera feed on the Reolink app or client software.
- Finalize the Installation:
- Tidy up the cable routing using clips or conduits to keep it secure and organized.
- Perform a final test to ensure proper functionality and coverage.
Tips for Effective Installation
- Plan Cable Routing:
- Avoid routing cables near sharp edges or areas prone to water exposure.
- Use Proper Weatherproofing:
- Seal all connections and entry points with silicone or weatherproof tape to prevent water ingress.
- Test Before Finalizing:
- Temporarily mount the camera and test its view before securing it permanently.
Troubleshooting Common Issues
- No Power or Signal:
- Check the Ethernet cable for damage or improper connections.
- Ensure the PoE switch or injector is functioning correctly.
- Blurry or Obstructed View:
- Clean the camera lens and adjust its angle to remove obstructions.
- Loose Mounting:
- Re-tighten screws and ensure the bracket is firmly attached to the surface.
Also Read: How To Install Opengd77 Python Cps Software
Conclusion
Installing your Reolink Trackmix PoE camera away from a downspout improves performance and durability. By following these steps and tips, you can ensure a secure and effective installation for enhanced surveillance.